Microsoft unveiled .NET Aspire back in November 2023 and I recently had my first encounter with it while working on a project. My prior focus had been elsewhere, but this project unexpectedly introduced me to a tool that has proven to be a compelling solution for tackling the complexities of modern distributed applications. Aspire is an incredible tool for streamlining our local development environment.
This experience was the initial spark, but it ignited a deeper curiosity within me: what exactly can .NET Aspire do? The promise of simplified development, deployment, and management of distributed systems is certainly attractive, and a quick search online reveals a wealth of resources exploring its potential. Of course, as always, official Microsoft .NET Aspire will be an excellent starting point.
My journey to understanding Aspire was significantly accelerated by a fantastic YouTube video I stumbled upon — https://www.youtube.com/watch?v=e36NEWqO7GQ by @JamesMontemagno. James does a great job of breaking down the core concepts and demonstrating Aspire in action, making it much easier to grasp its capabilities quickly.
Inspired by what I learned, I decided to put .NET Aspire to the test with a real-world scenario—my existing sample distributed application project. You might remember this project from my previous blog post, “Building a Distributed System with Cursor AI: A Developer’s First Impressions,” which you can revisit here: https://www.codeygrove.com/blogs/technology/building-a-distributed-system-with-cursor-ai-a-developers-first-impressions/. This project, initially built with the assistance of Cursor, served as an excellent foundation for exploring Aspire’s orchestration features.
Now, I want to walk you through the steps I took to orchestrate each component of this project using .NET Aspire. My goal is to provide a practical, hands-on guide that demonstrates how Aspire can simplify the management of distributed systems. You can follow along with the exact same code by cloning the repository from https://github.com/codeygrove-learning-repo/AspireLearning.
Pre-requisites to this guide
Before we start, there are a few resources that you’ll need to create or install:
- MongoDB, either as a local MongoDB service or via a free MongoDB cluster.
- Azure Account with the following resources created:
- Basic Service Bus Namespace (create a queue)
- Standard Event Hub Namespace
- Docker Desktop installed
- Visual Studio Code
- Visual Studio Community – with .NET Aspire feature installed
If the necessary resources have been created or installed, you can check the README for more details on how to inject test data into MongoDB and run the application. For this demo, I am using Visual Studio Community for most of the steps and VS Code to run the Vite + React App on Windows machine.
You can refer to my previous blog — https://www.codeygrove.com/blogs/technology/building-a-distributed-system-with-cursor-ai-a-developers-first-impressions/ — on the functionality of this sample distributed application.
Adding Aspire Orchestration Support to Order API
Before we start, ensure that you can run the sample application successfully on your local machine by referring to the README.
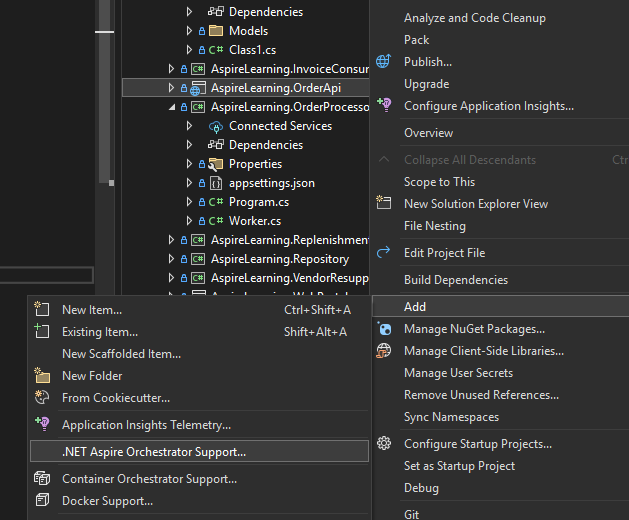
Let’s start by adding .NET Aspire Orchestrator Support for AspireLearning.OrderApi project.
- Right click on
AspireLearning.OrderApiproject — Add — .NET Aspire Orchestrator Support
- Upgrade
Aspire.Hosting.AppHostin the solution to thelatestversion (9.4.1 at the time of writing).
Aspire Orchestrator Support made the following changes to our solution:
AppHostproject was added. This is the .NET project that orchestrates the app model. For more information, refer to AppHost overview.ServiceDefaultsproject was added. It is specifically designed for sharing the Extensions.cs file and its functionality. Don’t include other shared functionality or models in this project. For more information, refer to .NET Aspire service default overview.ServiceDefaultsproject was added as reference inAspireLearning.OrderApiproject.AspireLearning.OrderApiproject was added as reference inAppHostproject.- And
builder.AddServiceDefaults()andapp.MapDefaultEndpoints()are added toAspireLearning.OrderApi–Program.cs
// The AddServiceDefaults method handles the following tasks:
// Configures OpenTelemetry metrics and tracing.
// Adds default health check endpoints.
// Adds service discovery functionality.
// Configures HttpClient to work with service discovery.
builder.AddServiceDefaults(); // Added by Aspire

// Add services to the container.
// Learn more about configuring OpenAPI at https://aka.ms/aspnet/openapi
builder.Services.AddOpenApi();
builder.Services.Configure<AspireLearning.Repository.MongoDbSettings>(builder.Configuration.GetSection("MongoDb"));
builder.Services.AddControllers();

// Add CORS
builder.Services.AddCors(options =>
{
    options.AddDefaultPolicy(policy =>
    {
        policy.WithOrigins("http://localhost:5173")
              .AllowAnyHeader()
              .AllowAnyMethod();
    });
});

var app = builder.Build();

// The MapDefaultEndpoints method:
// Allows consumers to optionally uncomment some code to enable the Prometheus endpoint.
// Maps the health checks endpoint to /health.
// Maps the liveness endpoint to /alive route where the health check tag contains live.
app.MapDefaultEndpoints(); // Added by AspireBefore we can start running the Aspire AppHost project, we need to prepare the environment variable for Order API. To do that we copy MongoDb and Service Bus configuration section from Order API to AppHost project appsettings.json (Ensure that AppHost project appsettings.json properties is updated to always copy to output directory).
{
  "Logging": {
    "LogLevel": {
      "Default": "Information",
      "Microsoft.AspNetCore": "Warning",
      "Aspire.Hosting.Dcp": "Warning"
    }
  },
  "MongoDb": {
    "ConnectionString": "mongodb://localhost:27017"
  },
  "ServiceBus": {
    "ConnectionString": "<SERVICEBUS_CONNSTR>"
  }
}Update AppHost project Program.cs to the following:
using Microsoft.Extensions.Configuration;

var builder = DistributedApplication.CreateBuilder(args);

// Load configuration
var config = new ConfigurationBuilder()
    .SetBasePath(AppContext.BaseDirectory)
    .AddJsonFile("appsettings.json", optional: false, reloadOnChange: true)
    .Build();

var mongoConnectionString = config["MongoDb:ConnectionString"];
var orderServiceBusConnectionString = config["ServiceBus:ConnectionString"];
var logLevel = config["Logging:LogLevel:Default"] ?? "Information";

builder.AddProject<Projects.AspireLearning_OrderApi>("aspirelearning-orderapi")
    .WithEnvironment("MongoDb__ConnectionString", mongoConnectionString)
    .WithEnvironment("ServiceBus__ConnectionString", orderServiceBusConnectionString)
    .WithEnvironment("Logging__LogLevel__Default", logLevel);

builder.Build().Run();
WithEnvironment method will override “MongoDb:ConnectionString”, “ServiceBus:ConnectionString” and “Logging:LogLevel:Default” configuration in Order API project. If you have a different database or collection name, they can be override using WithEnvironment method. With that, we can run the AppHost project from Visual Studio.
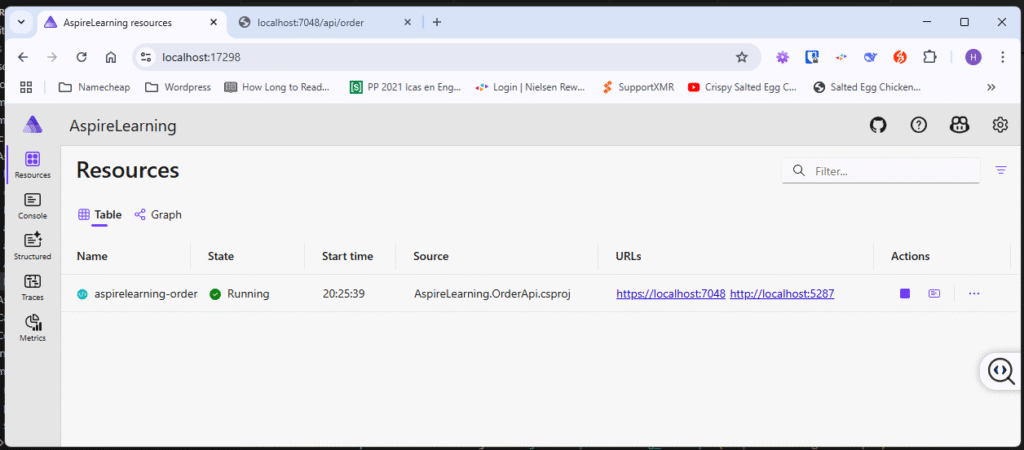
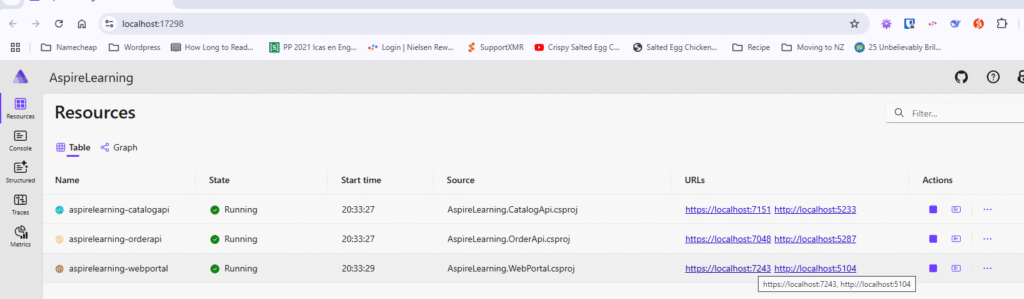
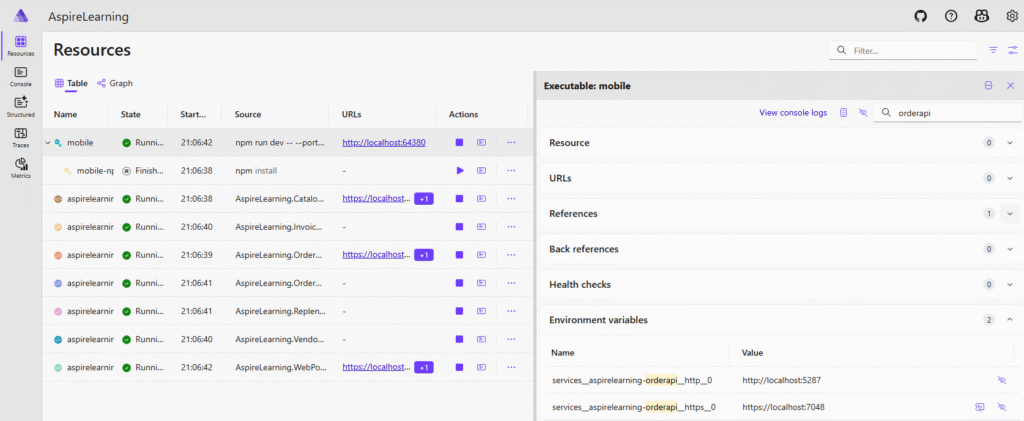
When AppHost project successfully loaded, you will be automatically log in to the Aspire Dashboard and landed on the Resources page.
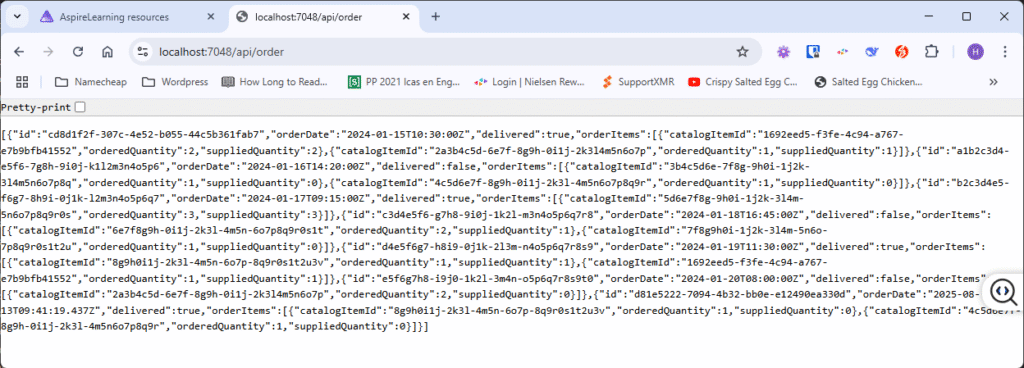
Let’s open up a new tab and query all orders through https://localhost:7048/api/order, followed by getting some of the order details from https://localhost:7048/api/order/<order_id>.
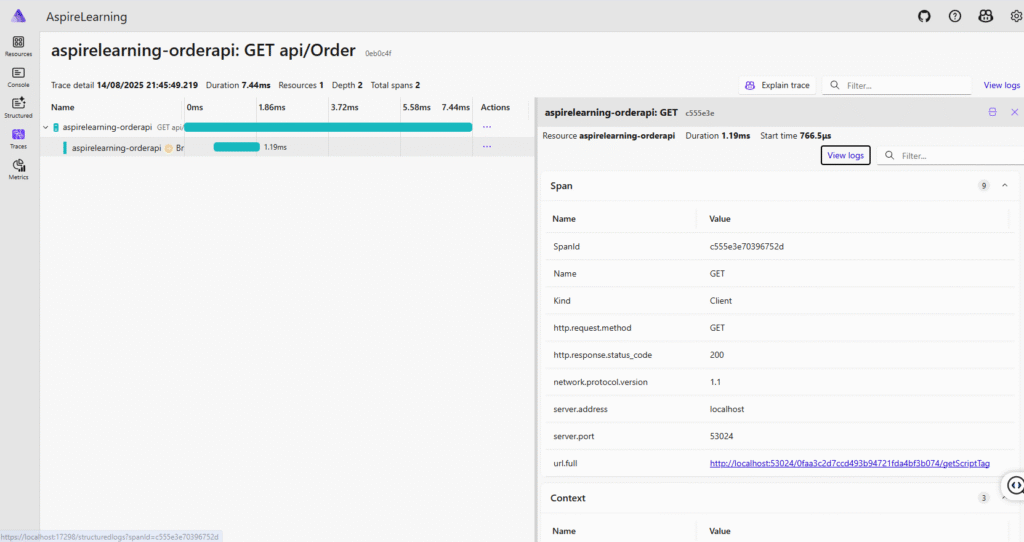
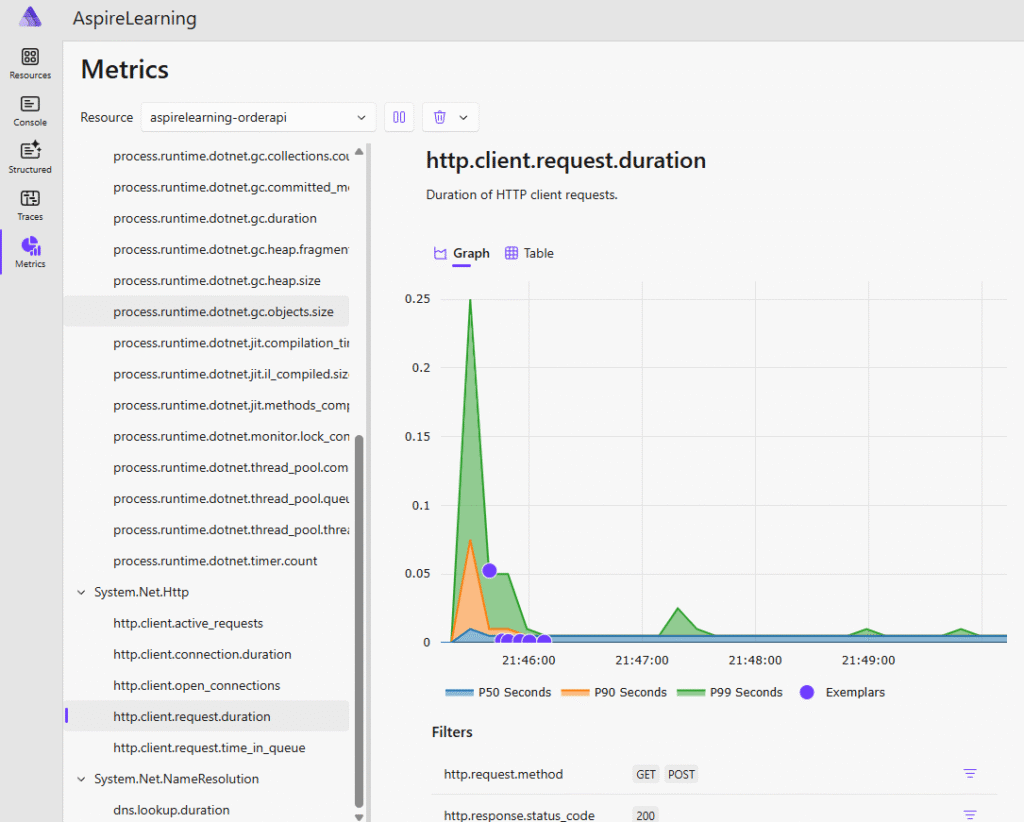
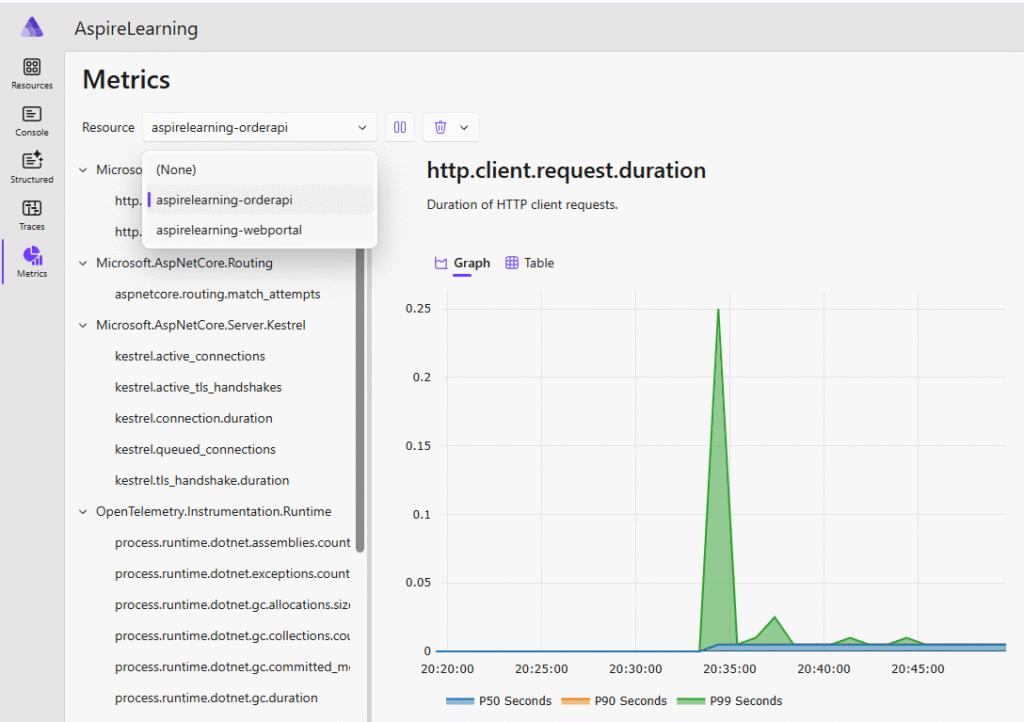
You can review the traces & metrics through its respective page. More information on how these telemetry is collected can be found in .NET Aspire telemetry – .NET Aspire | Microsoft Learn.
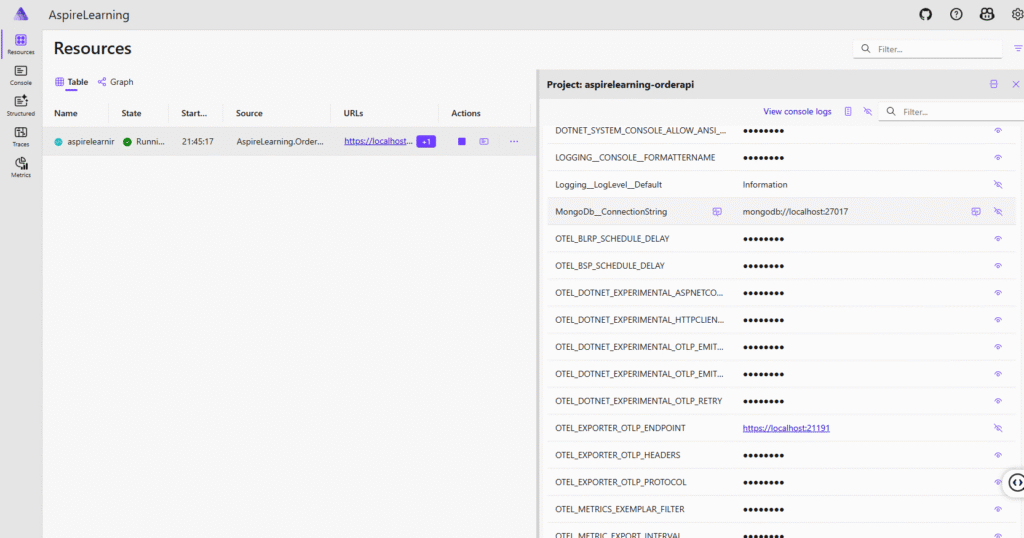
Last but not least, let’s review the environment variables for aspirelearning-orderapi resource. Go back to the Resources page and click on the resource to view its detail. Environment variables that we set in the Program.cs will be shown in this list.
Next, we can add Aspire support to both AspireLearning.CatalogApi and AspireLearning.WebPortal.
Adding Aspire Orchestration Support to Catalog API and Web Portal
With the AppHost project created in the solution, we can start orchestrate the rest of the projects to AppHost project. I explored two ways to achieve that when adding Web Portal and Catalog API.
First one is by using the “Add .NET Aspire Orchestrator Support” functionality like what we did with Order API. Let’s add AspireLearning.WebPortal project using the functionality. Right click on AspireLearning.WebPortal, followed by Add, then Add .NET Aspire Orchestrator Support. With this method, .NET Aspire will add necessary project references to Web Portal. In addition to that, AddServiceDefaults and MapDefaultEndpoints methods are added to Web Portal Program.cs. Last but not least, in the AppHost project Program.cs, Web Portal will also be added to the IDistributedApplicationBuilder.
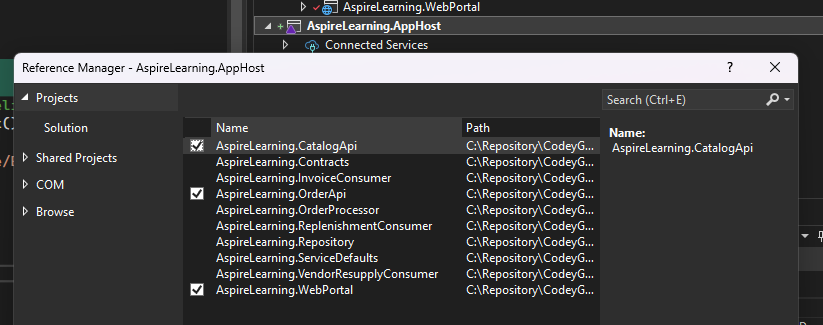
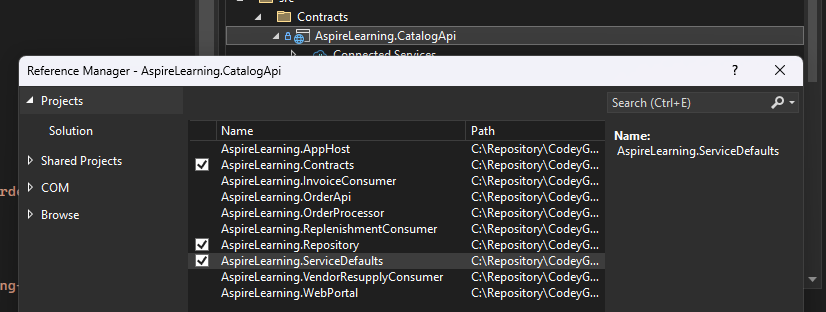
Another option is to manually add the project using project reference. The following screenshot shows how to add Catalog API to the AppHost project through Project Reference.
If we manually include Catalog API to AppHost project, remember to add it to IDistributedApplicationBuilder in the Program.cs. After we configured all the environment variables, our code for Web Portal and Catalog API will look like:
var orderApi = builder.AddProject<Projects.AspireLearning_OrderApi>("aspirelearning-orderapi")
    .WithEnvironment("MongoDb__ConnectionString", mongoConnectionString)
    .WithEnvironment("ServiceBus__ConnectionString", orderServiceBusConnectionString)
    .WithEnvironment("Logging__LogLevel__Default", logLevel);

var catalogApi = builder.AddProject<Projects.AspireLearning_CatalogApi>("aspirelearning-catalogapi")
    .WithEnvironment("MongoDb__ConnectionString", mongoConnectionString)
    .WithEnvironment("Logging__LogLevel__Default", logLevel);

builder.AddProject<Projects.AspireLearning_WebPortal>("aspirelearning-webportal")
    .WithEnvironment("Logging__LogLevel__Default", logLevel)
    // Adds a reference to the orderApi and catalogApi resources and
    // Waits for them to be ready using the WithReference and WaitFor methods.
    .WithReference(orderApi)
    .WithReference(catalogApi)
    .WaitFor(orderApi)
    .WaitFor(catalogApi);

builder.Build().Run();Both WithReference and WaitFor methods are used to express dependencies between resources. In this particular case, the Web Portal is dependent on both the Order and Catalog APIs (WithReference) and will only start once both APIs are running successfully (WaitFor).
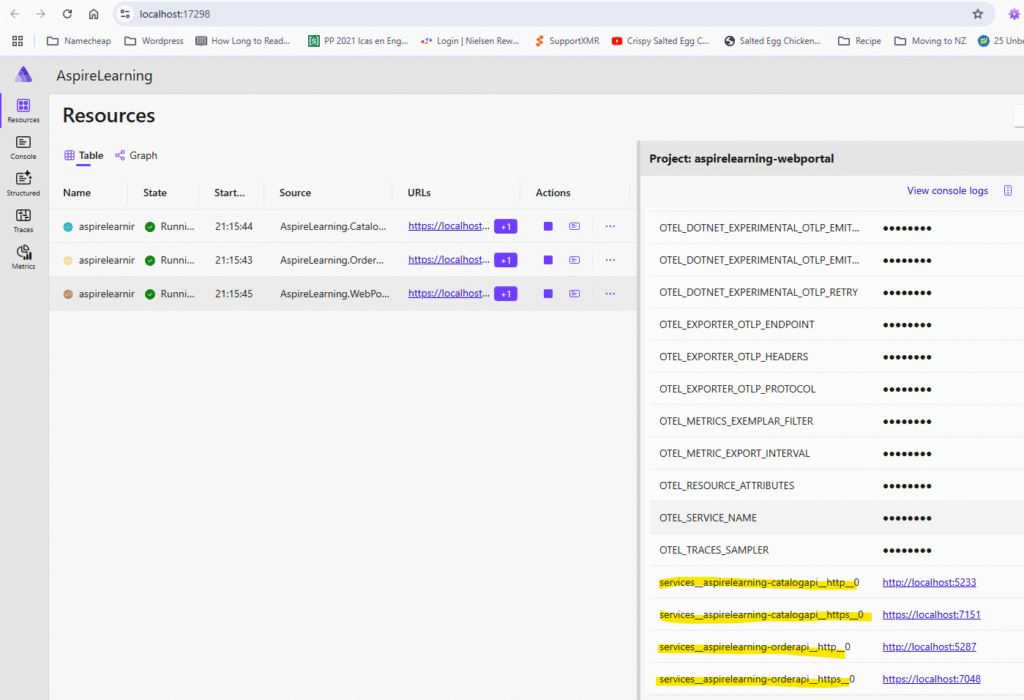
Run the AppHost project and once you have logged in to the Aspire Dashboard, open up the web portal from the dashboard and click on Catalog & Order menu. While you are in its respective page, click on some of the record to view its detail.
On the dashboard, review the traces and metrics collected. Notice that in the metrics page, aspirelearning-catalogapi resource is not in the dropdown box.
In order to collect metrics for Catalog API, add AspireLearning.ServiceDefaults project as a reference into AspireLearning.CatalogApi csproj.
Followed by adding both AddServiceDefaults and MapDefaultEndpoints methods to its Program.cs.
var builder = WebApplication.CreateBuilder(args);

builder.AddServiceDefaults();

// Add services to the container.
// Learn more about configuring OpenAPI at https://aka.ms/aspnet/openapi
builder.Services.AddOpenApi();
builder.Services.Configure<AspireLearning.Repository.MongoDbSettings>(builder.Configuration.GetSection("MongoDb"));
builder.Services.AddControllers();

var app = builder.Build();

app.MapDefaultEndpoints();Re-run the AppHost project, open the Web Portal and click around the portal. This time, Catalog API metrics are collected and you can review it in the Metrics page.
.NET Aspire Service Discovery
.NET Aspire includes functionality for configuring service discovery at development and testing time. Service discovery functionality works by providing configuration in the format expected by the configuration-based endpoint resolver from the .NET Aspire AppHost project to the individual service projects added to the application model. For more information, see Service discovery in .NET.
Let’s explore how we can leverage implicit service discovery for Order and Catalog API in Web Portal. When we add the Web Portal to Aspire, WithReference extension methods were used to indicate that Web Portal is dependent on both API. These extension methods instructed the .NET Aspire project to pass service discovery information for the referenced projects (Order, and Catalog) into the Web Portal.
builder.AddProject<Projects.AspireLearning_WebPortal>("aspirelearning-webportal")
    .WithEnvironment("Logging__LogLevel__Default", logLevel)
    .WithReference(orderApi) // Instruct .NET Aspire project to pass service discovery information for Order API
    .WithReference(catalogApi) // Instruct .NET Aspire project to pass service discovery information for Catalog API
    .WaitFor(orderApi)
.WaitFor(catalogApi);You can view these service discovery information in Web Portal by viewing the detail of aspirelearning-webportal resource from Aspire Dashboard.
To use these information in the Web Portal, we need to make some changes in AspireLearning.WebPortal project.
- We create two named
HttpClientfor both Order and Catalog API in theProgram.cs
var builder = WebApplication.CreateBuilder(args);

builder.AddServiceDefaults(); // Adds common .NET Aspire services: service discovery, resilience, health checks, and OpenTelemetry.

// Add services to the container.
builder.Services.AddControllersWithViews();

// "aspirelearning-catalogapi" is the friendly name used for the resource in AspireLearning.AppHost
builder.Services.AddHttpClient("aspirelearning-catalogapi", httpClient =>
{
    httpClient.BaseAddress = new Uri("https+http://aspirelearning-catalogapi");
});

// "aspirelearning-orderapi" is the friendly name used for the resource in AspireLearning.AppHost
builder.Services.AddHttpClient("aspirelearning-orderapi", httpClient =>
{
    httpClient.BaseAddress = new Uri("https+http://aspirelearning-orderapi");
});- We remove the hard-coded API base URL in Web Portal’s
OrderControllerandCatalogController. - We create
aspirelearning-catalogapiHttpClientinCatalogControllerConstructor. - We create
aspirelearning-orderapiHttpClientinOrderControllerConstructor.
    public class OrderController : Controller
    {
        private readonly HttpClient _httpClient;
        //private readonly string _apiBase = "https://localhost:5002/api/order";
        //private readonly string _apiBase = "https://localhost:7048/api/order";
        private readonly string _apiBase = "api/order";

        public OrderController(IHttpClientFactory httpClientFactory)
        {
            _httpClient = httpClientFactory.CreateClient("aspirelearning-orderapi");
        }
public class CatalogController : Controller
{
private readonly HttpClient _httpClient;
//private readonly string _apiBase = "https://localhost:5001/api/catalog";
//private readonly string _apiBase = "https://localhost:7151/api/catalog";
private readonly string _apiBase = "api/catalog";
public CatalogController(IHttpClientFactory httpClientFactory)
{
_httpClient = httpClientFactory.CreateClient("aspirelearning-catalogapi");
}More information about service discovery, refer to .NET Aspire Service Discovery and Service Discovery in .NET.
Add Service Bus Consumer to .NET Aspire Orchestrator
We will now add the remaining consumers to .NET Aspire using “Add .NET Aspire Orchestrator Support” functionality. We will start with Order Processor Service Bus consumer by Right click on AspireLearning.OrderProcessor csproj –> Add –> Add .NET Aspire Orchestrator Support and followed by updating AppHost project Program.cs as below:
// This setting is required by all consumer
var eventHubConnectionString = config["EventHub:ConnectionString"];

// OrderProcessor
var orderProcessor = builder.AddProject<Projects.AspireLearning_OrderProcessor>("aspirelearning-orderprocessor")
    .WithEnvironment("ServiceBus__ConnectionString", orderServiceBusConnectionString)
    .WithEnvironment("EventHub__ConnectionString", eventHubConnectionString)
.WithEnvironment("Logging__LogLevel__Default", logLevel);Since the Order Processor publishes events to the Event Hub, we also need to copy over the event hub configuration section to the AppHost project appsettings.json.
{
  "Logging": {
    "LogLevel": {
      "Default": "Information",
      "Microsoft.AspNetCore": "Warning",
      "Aspire.Hosting.Dcp": "Warning"
    }
  },
  "MongoDb": {
    "ConnectionString": "mongodb://localhost:27017"
  },
  "ServiceBus": {
    "ConnectionString": "<SERVICEBUS_CONNSTR>"
  },
  "EventHub": {
    "ConnectionString": "<EVENTHUB_CONNSTR>"
  }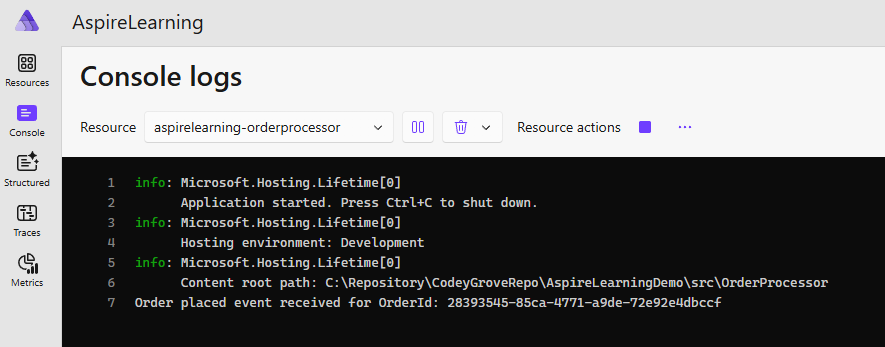
}Run AppHost project, from Aspire Dashboard, go to Web Portal -- Order Menu -- Click Add New Order

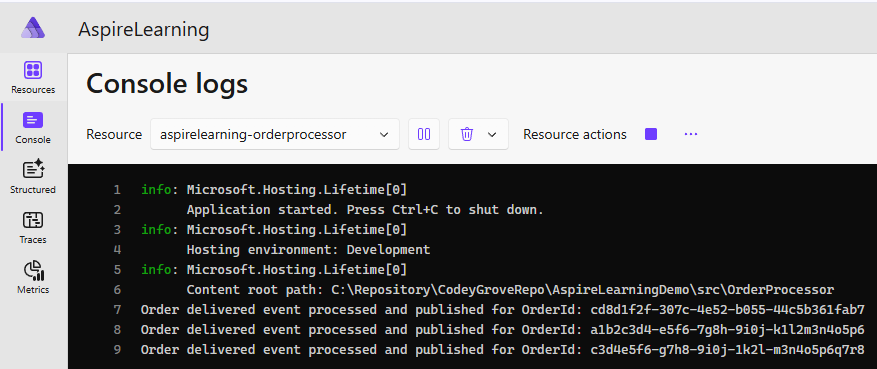
Once new order has been created, go back to Aspire Dashboard — click on Console — from Resource drop down list, select “aspirelearning-orderprocessor” and verify that it received the order placed event for the newly created order.
Add Event Hub Consumer to .NET Aspire Orchestrator
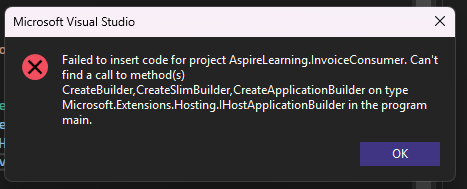
Next step is to add three of the event hub consumers that processing incoming order delivered events from Order Processor. We’ll begin by adding .NET Aspire Orchestrator Support to the Invoice Consumer. When Visual Studio is attempting to make the update, it will throw the following error because AspireLearning.InvoiceConsumer project’s Program.cs doesn’t use one of the standard host-building methods like CreateApplicationBuilder.
To fix the above issue, we need to convert Program.cs in all three event consumer projects to .NET Generic Host and moved the events processing logic to the Worker.cs BackgroundService. Below is the Program.cs for AspireLearning.InvoiceConsumer.
var builder = Host.CreateApplicationBuilder(args);

builder.Services.AddHostedService<AspireLearning.InvoiceConsumer.Worker>();

var host = builder.Build();
host.Run();And AspireLearning.InvoiceConsumer Worker.cs BackgroundService.
using Azure.Messaging.EventHubs.Consumer;

namespace AspireLearning.InvoiceConsumer;

public class Worker : BackgroundService
{
    private readonly ILogger<Worker> _logger;
    private readonly IConfiguration _config;

    public Worker(ILogger<Worker> logger, IConfiguration config)
    {
        _logger = logger;
        _config = config;
    }

    protected override async Task ExecuteAsync(CancellationToken stoppingToken)
    {
        var eventHubConnectionString = _config["EventHub:ConnectionString"];
        var eventHubName = _config["EventHub:EventHubName"];
        var consumerGroup = _config["EventHub:ConsumerGroup"];

        await using var consumer = new EventHubConsumerClient(consumerGroup, eventHubConnectionString, eventHubName);

        Console.WriteLine("InvoiceConsumer started. Listening for events...");

        while (!stoppingToken.IsCancellationRequested)
        {
            await foreach (PartitionEvent partitionEvent in consumer.ReadEventsAsync(CancellationToken.None))
            {
                if (partitionEvent.Data?.EventBody != null)
                {
                    string data = partitionEvent.Data.EventBody.ToString();
                    Console.WriteLine($"[InvoiceConsumer] Received event: {data}");
                }
            }
        }
    }
}Followed by AspireLearning.ReplenishmentConsumer Program.cs.
var builder = Host.CreateApplicationBuilder(args);

builder.Services.AddHostedService<AspireLearning.ReplenishmentConsumer.Worker>();

var host = builder.Build();
host.Run();And AspireLearning.ReplenishmentConsumer Worker.cs BackgroundService.
using Azure.Messaging.EventHubs.Consumer;

namespace AspireLearning.ReplenishmentConsumer;

public class Worker : BackgroundService
{
    private readonly ILogger<Worker> _logger;
    private readonly IConfiguration _config;

    public Worker(ILogger<Worker> logger, IConfiguration config)
    {
        _logger = logger;
        _config = config;
    }

    protected override async Task ExecuteAsync(CancellationToken stoppingToken)
    {
        var eventHubConnectionString = _config["EventHub:ConnectionString"];
        var eventHubName = _config["EventHub:EventHubName"];
        var consumerGroup = _config["EventHub:ConsumerGroup"];

        await using var consumer = new EventHubConsumerClient(consumerGroup, eventHubConnectionString, eventHubName);

        Console.WriteLine("ReplenishmentConsumer started. Listening for events...");

        while (!stoppingToken.IsCancellationRequested)
        {
            await foreach (PartitionEvent partitionEvent in consumer.ReadEventsAsync(CancellationToken.None))
            {
                if (partitionEvent.Data?.EventBody != null)
                {
                    string data = partitionEvent.Data.EventBody.ToString();
                    Console.WriteLine($"[ReplenishmentConsumer] Received event: {data}");
                }
            }
        }
    }
}Finally, AspireLearning.VendorResupplyConsumer Program.cs.
var builder = Host.CreateApplicationBuilder(args);

builder.Services.AddHostedService<AspireLearning.VendorResupplyConsumer.Worker>();

var host = builder.Build();
host.Run();And AspireLearning.VendorResupplyConsumer Worker.cs BackgroundService.
using Azure.Messaging.EventHubs.Consumer;

namespace AspireLearning.VendorResupplyConsumer;

public class Worker : BackgroundService
{
    private readonly ILogger<Worker> _logger;
    private readonly IConfiguration _config;

    public Worker(ILogger<Worker> logger, IConfiguration config)
    {
        _logger = logger;
        _config = config;
    }

    protected override async Task ExecuteAsync(CancellationToken stoppingToken)
    {
        var eventHubConnectionString = _config["EventHub:ConnectionString"];
        var eventHubName = _config["EventHub:EventHubName"];
        var consumerGroup = _config["EventHub:ConsumerGroup"];

        await using var consumer = new EventHubConsumerClient(consumerGroup, eventHubConnectionString, eventHubName);

        Console.WriteLine("VendorResupplyConsumer started. Listening for events...");

        while (!stoppingToken.IsCancellationRequested)
        {
            await foreach (PartitionEvent partitionEvent in consumer.ReadEventsAsync(CancellationToken.None))
            {
                if (partitionEvent.Data?.EventBody != null)
                {
                    string data = partitionEvent.Data.EventBody.ToString();
                    Console.WriteLine($"[VendorResupplyConsumer] Received event: {data}");
                }
            }
        }
    }
}Once all three consumers’ Program.cs and Worker.cs have been modified, Add .NET Aspire Orchestrator Support to each of the csproj and follow by updating the Program.cs in the AppHost project to set the environment variable for each of the consumer.
// InvoiceConsumer
var invoiceConsumer = builder.AddProject<Projects.AspireLearning_InvoiceConsumer>("aspirelearning-invoiceconsumer")
    .WithEnvironment("EventHub__ConnectionString", eventHubConnectionString)
    .WithEnvironment("Logging__LogLevel__Default", logLevel);

// VendorResupplyConsumer
var resupplyConsumer = builder.AddProject<Projects.AspireLearning_VendorResupplyConsumer>("aspirelearning-vendorresupplyconsumer")
    .WithEnvironment("EventHub__ConnectionString", eventHubConnectionString)
    .WithEnvironment("Logging__LogLevel__Default", logLevel);

// ReplenishmentConsumer
var replenishmentConsumer = builder.AddProject<Projects.AspireLearning_ReplenishmentConsumer>("aspirelearning-replenishmentconsumer")
    .WithEnvironment("EventHub__ConnectionString", eventHubConnectionString)
    .WithEnvironment("Logging__LogLevel__Default", logLevel);

// Only start web portal after all services and consumers are ready
builder.AddProject<Projects.AspireLearning_WebPortal>("aspirelearning-webportal")
    .WithEnvironment("Logging__LogLevel__Default", logLevel)
    .WithReference(orderApi)
    .WithReference(catalogApi)
    .WaitFor(orderApi)
    .WaitFor(catalogApi)
    .WaitFor(orderProcessor)
    .WaitFor(invoiceConsumer)
    .WaitFor(resupplyConsumer)
    .WaitFor(replenishmentConsumer);

builder.Build().Run();Note that, in the above, the Web Portal project is not only depend on Order and Catalog API, it also depend on all the consumers. It will only start once the rest of the projects has been started successfully. But before we can test the order delivered events, we still need to include the Vite + React mobile app into the Aspire.
Orchestrate Vite Application in Aspire
In order to orchestrate Vite + React application, I used .NET Aspire Community Toolkit Node.js hosting extensions.
- We begin by Adding
CommunityToolkit.Aspire.Hosting.NodeJS.ExtensionsNuGet package toAppHostproject. - Then we update
AppHostprojectProgram.csright before the application is built and run.
builder.AddViteApp("mobile", "../mobileapp") // ../mobileapp is the folder of the Vite application code base
    .WithReference(orderApi)
    .WaitFor(orderApi) // Create dependency to orderApi resource
    .WithNpmPackageInstallation(); // Use the package manager to install the packages before starting application

builder.Build().Run();There are a few things to go through before we run the AppHost project:
- “../mobileapp” is the folder where the Vite application codebase is located.
- We used
WithReferenceandWaitForto inform Aspire that our Vite application is dependent on Order API. - And before Aspire starts the Vite application, it needs to install necessary packages for the Vite application to run and
WithNpmPackageInstallationmethod is used to achieve that.
With that, let’s run the AppHost project and we can review the Dashboard:
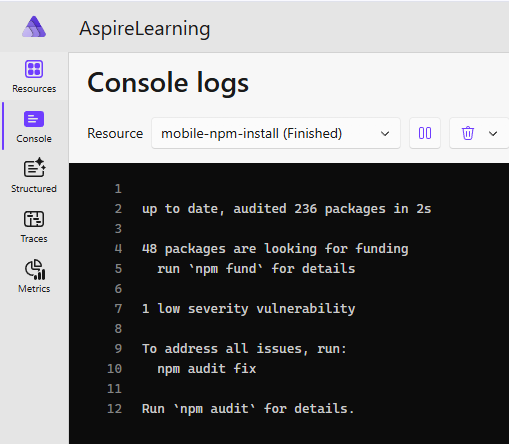
- In the console page, select “mobile-npm-install (Finished)” from the drop down list and the console shows the
npm installcommand output.
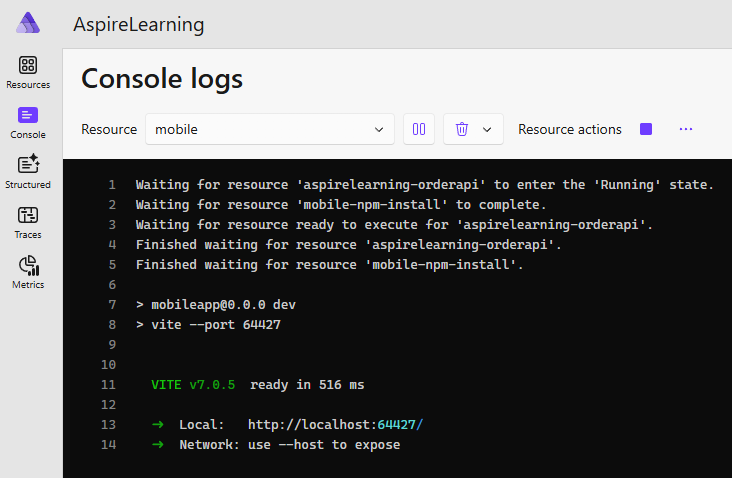
- Next, we select “mobile” from the Resource drop down list. Notice that, Aspire will assign a random port to run the Vite application instead of using the default Vite port (5173).
- Last but not least, go back to “Resources” page and click on “mobile” resource to view its environment variables (filter by
orderapi). Because we used theWithReferencemethod, Aspire added the Order API service discovery information to the environment variables.
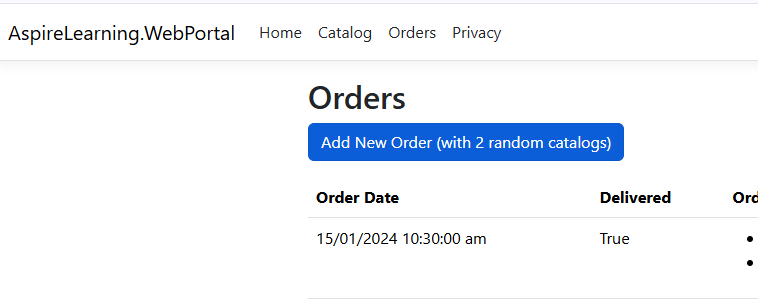
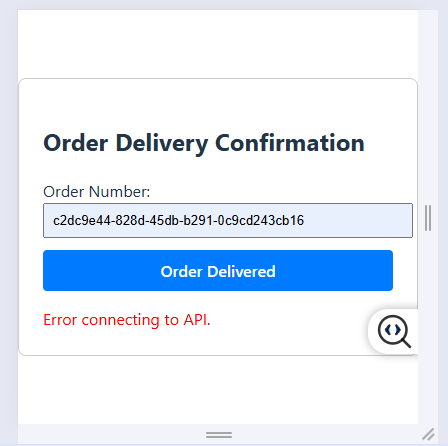
Once we have reviewed the above, click on “mobile” resource URLs. After the Vite application loaded successfully, type the “Order Number” that we want to set as delivered. If you need an order number, you can open the Web Portal — Order Menu — Create a new order or click on one of the existing order to view its order number.
Sadly, the Vite application encountered errors when connecting to Order API. We can see the actual error through the browser Developer Tools. Open the Developer Tools and in the console, we can see that it fail because of the CORS policy.
Access to fetch at 'https://localhost:7048/api/order/deliver/c2dc9e44-828d-45db-b291-0c9cd243cb16' from origin 'http://localhost:64380' has been blocked by CORS policy: Response to preflight request doesn't pass access control check: No 'Access-Control-Allow-Origin' header is present on the requested resource.Configure Vite Development Proxy
If you open AspireLearning.OrderApi‘s Program.cs, you’ll see that its CORS policy is configured to only allow a front-end application running at http://localhost:5173 to make requests to the Order API. Because Aspire runs the Vite application on a random port, we need to configure a development proxy on the Vite application to redirect front-end API requests to the Order API server.
- Remove the CORS policy configuration in the Order API
Program.cs. Note, for a production environment, you should configure CORS correctly to allow requests only from trusted origins instead of removing the policy entirely.
//REMOVE ALL THESE LINES
//For production, configure CORS correctly to allow requests only from trusted origins
//https://learn.microsoft.com/en-us/aspnet/core/security/cors?view=aspnetcore-9.0
//builder.Services.AddCors(options =>
//{
//    options.AddDefaultPolicy(policy =>
//    {
//        policy.WithOrigins("http://localhost:5173")
//              .AllowAnyHeader()
//              .AllowAnyMethod();
//    });
//});- Modify
src\mobileapp\src\App.tsxby removing the hardcode Order API end point.
const handleSubmit = async (e: React.FormEvent) => {
  e.preventDefault();
  setStatus(null);
  if (!orderId) {
    setStatus('Please enter an order number.');
    return;
  }
  try {
    const response = await fetch(`/api/order/deliver/${orderId}`, {
      method: 'PUT',
    });
    if (response.ok) {
      setStatus('Order marked as delivered!');
    } else {
      setStatus('Failed to mark order as delivered.');
    }
  } catch (err) {
    setStatus('Error connecting to API.');
  }
};- We need to create a custom proxy rule in
src\mobileapp\vite.config.tsso that every request from front-end that start with/api, it will be re-directed toVITE_ORDER_API_URL.
import { defineConfig } from 'vite'
import react from '@vitejs/plugin-react'

// https://vite.dev/config/
export default defineConfig({
  plugins: [react()],
    server:{
      proxy: {
        '/api': {
          target: process.env['VITE_ORDER_API_URL'],
          changeOrigin: true,
          secure: false,
          rewrite: (path) => path
        }
      }
    }
})- Since the
targetURL in the proxy is usingVITE_ORDER_API_URLcustom environment variable, we need to ensure that this variable is configured in theAddViteAppin theAppHostproject. Since we are not leveraging the .NET service discovery in the Vite application, we don’t needWithReference. And it is important to point out that theVITE_ORDER_API_URLonly get assigned after Order API resource end point has been allocated by Aspire. Refer to this for more information: https://github.com/dotnet/aspire/discussions/5954#discussioncomment-10840035.
builder.AddViteApp("mobile", "../mobileapp")
    .WaitFor(orderApi)
    .WithEnvironment(ctx =>
    {
        //https://github.com/dotnet/aspire/discussions/5954#discussioncomment-10840035
        ctx.EnvironmentVariables.Add("VITE_ORDER_API_URL", orderApi.GetEndpoint("https").Url);
    })
.WithNpmPackageInstallation();After we configured the development proxy for Vite application, we can run the AppHost project to test out the order delivered scenario.
- Open the Web Portal from Aspire dashboard and copy the order number that has Delivered flag equal to
false
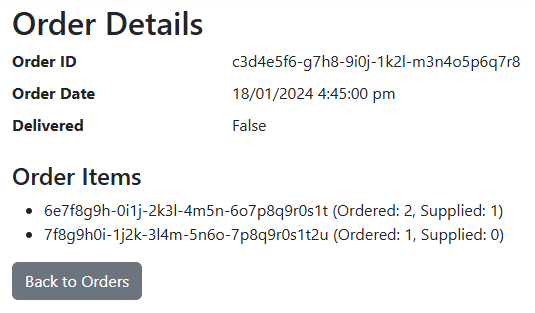
- Open the mobile resource from Aspire dashboard and marked the order as delivered and confirmed that the order is set to delivered in the Web Portal.
- Next, on Aspire dashboard, go to Console page and verified that Order Processor received the delivered event
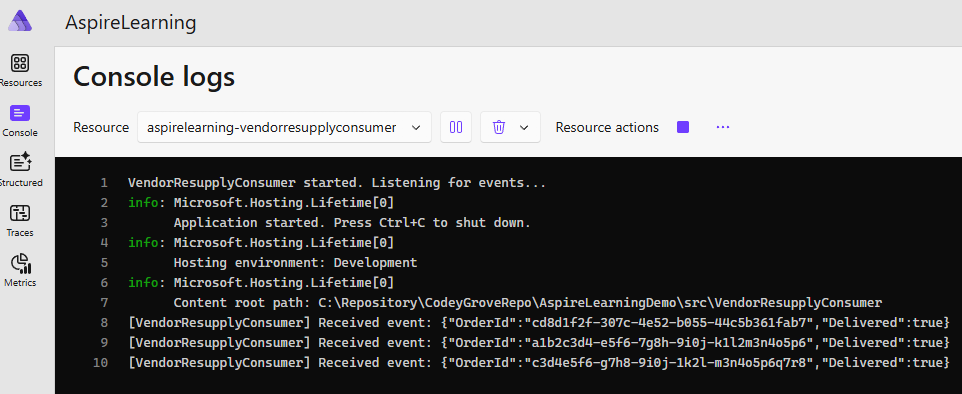
- Last but not least, confirm that three of the event hubs consumer received the delivered event from Order Processor.
Conclusion
Through this guide, we’ve explored how .NET Aspire simplifies the often complex process of orchestrating a distributed application. We’ve seen first-hand how its features can streamline your local development workflow, from managing multiple service dependencies to configuring environment variables and collecting telemetry data seamlessly. Aspire’s ability to automatically discover and manage services and their dependencies is a significant step forward, greatly reducing the amount of manual setup typically required.
While this post focused on the local development experience, it’s important to remember that Aspire’s capabilities also extend to production deployment. It’s designed to automatically allocate and configure the necessary resources, making the transition from a local to a deployed environment much smoother.
The journey into Aspire’s core functionality is extensive, and if you’re eager to explore the concepts further, I highly recommend visiting @JamesMontemagno’s YouTube video: https://www.youtube.com/watch?v=e36NEWqO7GQ. James does an exceptional job of explaining the foundational principles that make Aspire such a powerful tool.
Given the scope of this article, we couldn’t go into every detail. For instance, a more secure and robust setup would involve using a key vault to manage environment secrets, a topic I hope to cover in a future post. This leads me to my next planned exploration: delving into how Aspire can integrate with technologies like Service Bus, Event Hub, and MongoDB, enabling you to build and test your applications locally without needing to connect to the actual cloud resources.
For those who want to follow along with the exact code from this guide, I have checked in all the working changes to the ForDemo branch of my GitHub repository.
I hope this guide has provided you with a clear, practical understanding of how to get started with .NET Aspire and its potential to simplify your distributed application development.

Leave a Reply